Analog MIC
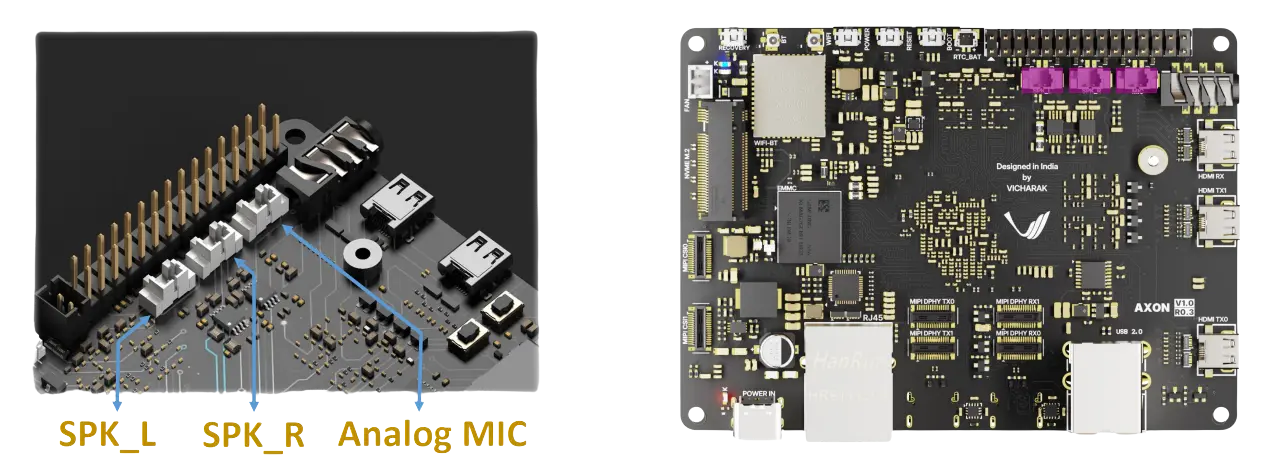
The Analog MIC input on the Axon board provides a flexible interface for acoustic sensing using a broad class of analog microphone technologies. Axon provides support for mics of different types and companies at the same time preserving dynamic range while minimizing noise.
Wiring and connectors
For Single ended mic:
Mic output → ANALOG_MIC pin (+)
Mic ground → GND (GPIO GND) on axon header
For Differential mic:
Mic output → ANALOG_MIC pin (+)
Mic ground → ANALOG_MIC pin (-)
How to Setup
Follow these steps to connect and use an analog microphone with the Axon board.
1. Connect the microphone
Connect your microphone to the Axon board:
If you are using single interface mic, just connect MIC_OUT to ANALOG_MIC PIN (+) and Microphone ground → Axon GND (Connect to GPIO GND)
Otherwise if you are using differential mic, connect MIC_OUT to ANALOG_MIC PIN (+) and MIC_GND to ANALOG_MIC PIN (-)
Refer to the Axon pinout documentation for exact pin locations Axon Pinouts
2. Detect the microphone
Boot the Axon board and open a terminal.
Run:
arecord -l
This will list available recording devices.
Example output:
  vicharak@vicharak:~$ aplay -l
**** List of PLAYBACK Hardware Devices ****
card 0: rockchipes8388 [rockchip-es8388], device 0: dailink-multicodecs ES8323 HiFi-0 [dailink-multicodecs ES8323 HiFi-0]
  Subdevices: 1/1
  Subdevice #0: subdevice #0
card 1: rockchipdp0 [rockchip-dp0], device 0: rockchip-dp0 spdif-hifi-0 [rockchip-dp0 spdif-hifi-0]
  Subdevices: 1/1
  Subdevice #0: subdevice #0
card 2: rockchipdp1 [rockchip-dp1], device 0: rockchip-dp1 spdif-hifi-0 [rockchip-dp1 spdif-hifi-0]
  Subdevices: 1/1
  Subdevice #0: subdevice #0
card 3: rockchiphdmi0 [rockchip-hdmi0], device 0: rockchip-hdmi0 i2s-hifi-0 [rockchip-hdmi0 i2s-hifi-0]
  Subdevices: 1/1
  Subdevice #0: subdevice #0
card 4: rockchiphdmi1 [rockchip-hdmi1], device 0: rockchip-hdmi1 i2s-hifi-0 [rockchip-hdmi1 i2s-hifi-0]
  Subdevices: 1/1
  Subdevice #0: subdevice #0
Look for rockchipes8388, it contains ES8388 which is an analog audio codec chip, which handles: audio.
Note down the device and card number to be used in below commands
In this example:
card 0, device 0 → plughw:0,0is used
3. Record Audio from Microphone
Prerequisites
Ensure:
Microphone is properly connected to the SBC
ALSA utilities are installed
Install if needed:
sudo apt install alsa-utils
Step 1: Record Audio
Record audio using:
arecord -D plughw:0,0 -f S16_LE -r 16000 -c 1 test.wav
Parameter Explanation
Parameter |
Meaning |
|---|---|
|
Select microphone device |
|
16-bit signed little-endian format |
|
Sampling rate (16 kHz) |
|
Mono recording |
|
Output file |
Step 2: Stop Recording
Press:
Ctrl + C
The audio will be saved as test.wav
Step 3: Playback Recorded Audio
Verify recording:
aplay test.wav
Recommended Settings for Speech Applications
Use:
arecord -D plughw:0,0 -f S16_LE -r 16000 -c 1 speech.wav
This configuration is ideal for:
Speech recognition
Voice assistants
Embedded AI applications
Notes
Use
plughwinstead ofhwto allow automatic format conversion16 kHz mono is sufficient for most voice applications
Higher sample rates (e.g., 44100 Hz) may be used for higher quality audio
Example:
arecord -D plughw:0,0 -f S16_LE -r 44100 -c 2 audio.wav
Troubleshooting
Quick Diagnostic Commands
List supported hardware parameters:
arecord -D hw:0,0 --dump-hw-params
Check microphone levels:
alsamixer
Press F4 → Capture devices
Increase capture volume if needed.
—
No audio detected
Check the following:
Microphone is connected correctly
Ground connection is secure
Microphone output is connected to MIC input
Device is visible using:
arecord -lCapture volume is not muted:
alsamixerPress F4 and increase Capture volume.
—
Low audio volume
Possible solutions:
Increase microphone gain using:
alsamixerUse a microphone module with built-in amplifier
Move closer to the microphone
—
Excessive noise or interference
Check the following:
Ensure proper grounding
Keep microphone wires short
Avoid routing microphone wires near power or digital signal lines
Use shielded cables if necessary
—
Hum or buzzing sound
Possible causes:
Ground loop issues
Poor shielding
Electrical interference from nearby components
Solutions:
Ensure common ground between microphone and Axon
Use shielded microphone cable
Keep microphone away from power sources and high-frequency components
—
Verification Checklist
Ensure the following:
Microphone is securely connected
Microphone appears in
arecord -lAudio recording works using
arecordAudio playback works using
aplayCapture volume is properly set using
alsamixer