Vicharak Linux Start Guide
Vicharak provides multiple Linux distributions for Axon SBC such as Debian, Ubuntu, etc. This guide will help you get started with Vicharak Linux systems.
System Management
Set Host Name and Password
Default account details (if installed from the official website):
Username: vicharak
Password: 12345
Vicharak Configuration Tool
vicharak-config tool:
Written using shell scripts
Allows configuration and setup of the Linux system
Provides a TUI interface
Supported on Debian-based systems (Debian buster/bullseye, Ubuntu focal/jammy, Armbian)
Usage:
Run
sudo vicharak-configto start the tool
Tip: Refer to Vicharak config tool guide for more detailed information.
Set Up Automatic Wi-Fi Connection on Boot
For the wlan0 interface (useful for headless systems):
Edit the
/userdata/before.txtfileAdd the following lines:
connect-wi-fi <network name> <password>Example:
connect-wi-fi my-wifi-network my-wifi-passwordReboot the system.
Debugging
UART Serial Console
Note: Windows users refer to Getting Started with Axon UART Serial Console.
Preparation
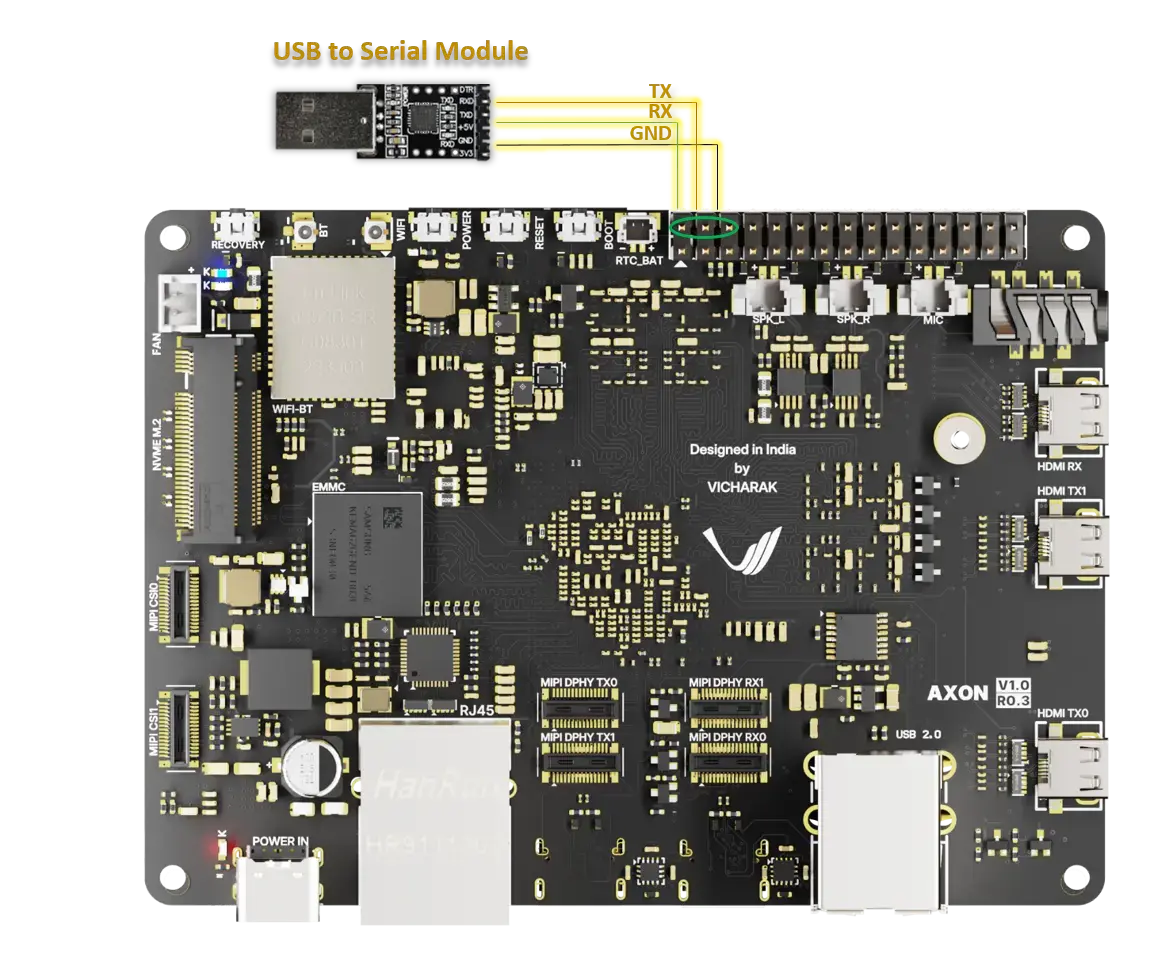
To access Axon SBC through the serial interface, a USB to UART serial cable or adapter is required.
Hardware Setup
Connect the USB to UART serial cable or adapter to your computer.
Connect the serial cable or adapter to the Axon SBC.
Serial FTDI Pin |
Header GPIO Pin |
Schematic Name |
|---|---|---|
RX |
Pin 2 (GPIO0_B5) |
UART2_RX_M0_DEBUG |
TX |
Pin 4 (GPIO0_B6) |
UART2_TX_M0_DEBUG |
GND |
Pin 6 |
GND |
Serial Console Programs
Install GTK-Term
You can install GTK-Term by executing the following command:
Debian/Ubuntu |
Fedora |
Arch Linux |
|---|---|---|
|
|
|
|
|
|
Setting up GTK-Term
Run GTK-Term by executing the following command:
sudo gtkterm
Configure GTK-Term
To access the configuration settings for GTK-Term, you can follow either of these methods:
Click on the Configuration menu and select Port.
Press Ctrl+Shift+S.
By using either of these methods, you will be able to access the configuration settings in GTK-Term, where you can make adjustments to the port settings for your serial connection.
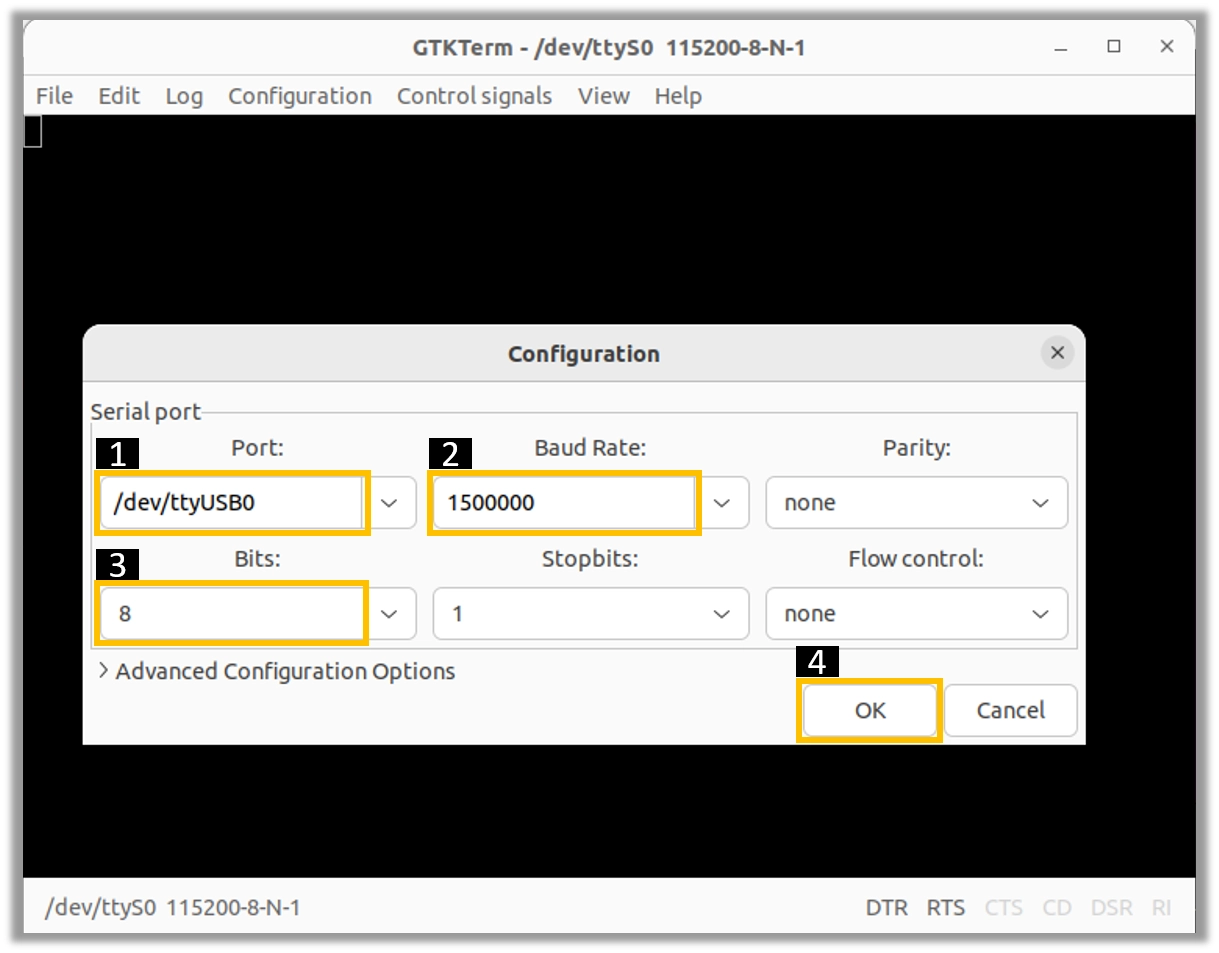
Note: Ensure that the cable is properly connected to the appropriate serial port on both devices.
Minicom (CLI)
Install Minicom:
For Linux, we will use Minicom. Install it with:
sudo apt install minicom
Package Names on Different Distributions:
Debian/Ubuntu
Fedora
Arch Linux
sudo apt updatesudo dnf updatesudo pacman -Syusudo apt install minicomsudo dnf install minicomsudo pacman -S minicomSetting up Minicom:
Connect the USB to UART converter to your computer and run the following command to find the port name:
sudo minicom -s
Select Serial port setup and press Enter.
+-----[configuration]------+
| Filenames and paths      |
| File transfer protocols  |
| **Serial port setup**    |
| Modem and dialing        |
| Screen and keyboard      |
| Save setup as dfl        |
| Save setup as..          |
| Exit                     |
| Exit from Minicom        |
+--------------------------+
Change the port name to the one you found in the previous step.
For example, if the port name is /dev/modem, then change it to /dev/ttyUSB0.
+-----------------------------------------------------------------------+
| A -    Serial Device      : /dev/ttyUSB0                              |
| B - Lockfile Location     : /var/lock                                 |
| C -   Callin Program      :                                           |
| D -  Callout Program      :                                           |
| E -    Bps/Par/Bits       : 115200 8N1                                |
| F - Hardware Flow Control : Yes                                       |
| G - Software Flow Control : No                                        |
|                                                                       |
|    Change which setting?                                              |
+-----------------------------------------------------------------------+
        | Screen and keyboard      |
        | Save setup as dfl        |
        | Save setup as..          |
        | Exit                     |
        | Exit from Minicom        |
        +--------------------------+
Configure baud rate of serial console according to your USB-UART converter.
Configure and Press Enter to save the settings.
+-----------------+---------[Comm Parameters]----------+----------------+
| A -    Serial De|                                    |                |
| B - Lockfile Loc|     Current: 1500000 8N1           |                |
| C -   Callin Pro| Speed            Parity      Data  |                |
| D -  Callout Pro| A: <next>        L: None     S: 5  |                |
| E -    Bps/Par/B| B: <prev>        M: Even     T: 6  |                |
| F - Hardware Flo| C:   9600        N: Odd      U: 7  |                |
| G - Software Flo| D:  38400        O: Mark     V: 8  |                |
|                 | E: 115200        P: Space          |                |
|    Change which |                                    |                |
+-----------------| Stopbits                           |----------------+
        | Screen a| W: 1             Q: 8-N-1          |
        | Save set| X: 2             R: 7-E-1          |
        | Save set|                                    |
        | Exit    |                                    |
        | Exit fro| Choice, or <Enter> to exit?        |
        +---------+------------------------------------+
Select Save setup as dfl and press Enter.
+-----[configuration]------+
| Filenames and paths      |
| File transfer protocols  |
| Serial port setup        |
| Modem and dialing        |
| Screen and keyboard      |
| **Save setup as dfl**    |
| Save setup as..          |
| Exit                     |
| Exit from Minicom        |
+--------------------------+
Save the settings as a different profile
If you want to save the settings as a different profile, select Save setup as.. and press Enter.
+-----[configuration]------+
| Filenames and paths      |
| File transfer protocols  |
| Serial port setup        |
| Modem and dialing        |
| Screen and keyboard      |
| Save setup as dfl        |
| **Save setup as..**      |
| Exit                     |
| Exit from Minicom        |
+--------------------------+
Select Exit and press Enter
+-----[configuration]------+
| Filenames and paths      |
| File transfer protocols  |
| Serial port setup        |
| Modem and dialing        |
| Screen and keyboard      |
| Save setup as dfl        |
| Save setup as..          |
| **Exit**                 |
| Exit from Minicom        |
+--------------------------+
On successful configuration, you will see the following screen:
Welcome to minicom 2.8
OPTIONS: I18n
Compiled on Jan  9 2021, 12:42:45.
Port /dev/ttyUSB0, 16:33:28
Press CTRL-A Z for help on special keys
To exit Minicom, press Ctrl-A followed by X.
SSH Tutorial
Windows users refer to
Getting Started with Axon Using SSH
SSH Client installation
This guide will cover the installation of default openssh-server.
Debian/Ubuntu |
Fedora |
Arch Linux |
|---|---|---|
|
|
|
|
|
|
SSH Server installation
Debian/Ubuntu |
Fedora |
Arch Linux |
|---|---|---|
|
|
|
|
|
|
SSH Server Configuration
Enable SSH service to start on boot
sudo systemctl enable ssh
Start SSH service
sudo systemctl start ssh
Check SSH service status
sudo systemctl status ssh
Note
If it is active and running, you should see a active (running) message.
Check SSH service port
sudo netstat -tulpn | grep ssh
Avahi-daemon installation and configuration
You can install Avahi-daemon using the following commands:
Debian/Ubuntu |
Fedora |
Arch Linux |
|---|---|---|
|
|
|
|
|
|
After the installation, Avahi-daemon should start automatically. If it does not, you can start it manually by running:
sudo systemctl start avahi-daemon
Verify its status by running:
sudo systemctl status avahi-daemon
Access Axon SBC through SSH
you can use either of the following commands:
SSH using the IP address
ssh username@ip_address
Tip
Replace “username” with the appropriate username for Axon and “ip_address” with the actual IP address assigned to Axon on the network.
SSH using the PC name (hostname)
ssh username@pc-name.local
Tip
Replace “username” with the appropriate username for Axon and “pc-name” with the actual PC name assigned to Axon on the network.