Vicharak Board Backup
Warning
We recommend to use Vicharak 6.1 kernel and latest Ubuntu 24.04 Noble Numbat , in order to support Board Backup. Flash Image using this Documentation
sudo apt update
sudo apt reinstall linux-image-6.1.75-axon linux-headers-6.1.75-axon
Note
You wont be able to take the backup of a running system. Say, you want to backup data from eMMC, then you would need to boot from another device, such as SD-Card, NVMe or SATA and take the backup after booting from that device.
Two types of backup have been provided.
Full Backup: This option is used to backup the entire software stack including the loaders, bootloader, kernel and rootfs. This creates a flashable image of the board.
Rootfs Backup: This option is used if you only want to backup the rootfs of your board. It uses the lossless gzip compression and creates a .tar.gz file of your rootfs.
Getting latest vicharak-config
Device Backup can be enabled through the latest update of vicharak-config. To get the latest version of vichrak-config, run commands given below:
sudo apt update
sudo apt install vicharak-config
Board Backup through vicharak-config
Steps to follow for Board Backup
Open a terminal window (
Ctrl+Alt+T).Run command
sudo vicharak-configin it.Select
Advanced Optionsoption in it by pressingEnterkey.
┌───────────────────────────────────┤ VICHARAK_CONFIG ├────────────────────────────────────┐
│ Please select an option below:                                                           │
│                                                                                          │
│                                   System Maintenance                                     │
│                                       Hardware                                           │
│                                       Overlays                                           │
│                                     Connectivity                                         │
│                                   Advanced Options                                       │
│                                     User Settings                                        │
│                                     Localization                                         │
│                                         About                                            │
│                                                                                          │
│                      <Ok>                               <Cancel>                         │
│                                                                                          │
└──────────────────────────────────────────────────────────────────────────────────────────┘
Select
Board Backupoption.
┌───────────────────────────────────┤ VICHARAK_CONFIG ├────────────────────────────────────┐
│ Please select an option below:                                                           │
│                                                                                          │
│                                        Mali GPU                                          │
│                                     Display Options                                      │
│                                       VNC Server                                         │
│                                  USB Advanced features                                   │
│                                      Board Backup                                        │
│                                                                                          │
│                                                                                          │
│                      <Ok>                               <Cancel>                         │
└──────────────────────────────────────────────────────────────────────────────────────────┘
Select the device which contains the system which you want to backup. The drive which has booted the system will not be shown as backing up a running system may lead to data corruption.
┌───────────────────────────────────┤ VICHARAK_CONFIG ├────────────────────────────────────┐
│ Select the drive which you want to backup:                                               │
│                                                                                          │
│                      /dev/sda      14.6G  Cruzer\x20Blade   disk                         │
│                      /dev/mmcblk1  14.8G                    disk                         │
│                                                                                          │
│                                                                                          │
│                                                                                          │
│                                                                                          │
│                      <Ok>                               <Cancel>                         │
└──────────────────────────────────────────────────────────────────────────────────────────┘
Read this note and decide which backup option you want to select. Then, select the required backup option and press
Enter. Then, insert a drive in which you want to take your backup into the board.
┌───────────────────────────────────┤ VICHARAK_CONFIG ├────────────────────────────────────┐
│ Available Backup Options:                                                                │
│                                                                                          │
│                          Full Backup (Creates a flashable image)                         │
│                          Rootfs Backup (Only copies root filesystem)                     │
│                                                                                          │
│                                                                                          │
│                      <Ok>                               <Cancel>                         │
└──────────────────────────────────────────────────────────────────────────────────────────┘
Select the drive in which you want to store the backup file. Suppose you want to store backup in
SanDisk\x203.2Gen1. Select/dev/sda 57.3G SanDisk\x203.2Gen1 diskand pressEnter.
┌───────────────────────────────────┤ VICHARAK_CONFIG ├────────────────────────────────────┐
│ Available drives for backup:                                                             │
│                                                                                          │
│                          /dev/sda   57.3G   SanDisk\x203.2Gen1   disk                    │
│                          /dev/sdb   14.6G   Cruzer\x20Blade      disk                    │
│                                                                                          │
│                                                                                          │
│                      <Ok>                               <Cancel>                         │
└──────────────────────────────────────────────────────────────────────────────────────────┘
Now, select the partition in which you want to store the backup file, and press
Enter.
┌───────────────────────────────────┤ VICHARAK_CONFIG ├────────────────────────────────────┐
│ Available partitions for selected disk:                                                  │
│                                                                                          │
│                                 /dev/sda1   15G     part                                 │
│                                 /dev/sda2   15G     part                                 │
│                                 /dev/sda3   27.3G   part                                 │
│                                                                                          │
│                                                                                          │
│                      <Ok>                               <Cancel>                         │
└──────────────────────────────────────────────────────────────────────────────────────────┘
You will see Warning Page saying the process will take time. Click on
yesand the backup process will start.Once the Backup is complete you will get the following log in vicharak-config.
┌───────────────────────────────────┤ VICHARAK_CONFIG ├────────────────────────────────────┐
│ [ OK ] Backup Complete!                                                                  │
│                                                                                          │
│ Backup file created at:                                                                  │
│ /media/vicharak/58fa9c45-0540-42a9-aa79-5911a3f73616/vicharak_axon_backup                │
│ /axon_rootfs_backup20250709_122223.tar.gz                                                │
│                                                                                          │
│                                                                                          │
│                                                                                          │
│                      <Ok>                               <Cancel>                         │
└──────────────────────────────────────────────────────────────────────────────────────────┘
Flashing the backup file to a board
Rockchip offers the RKDevTool as a fundamental development tool for Windows and MacOS, and the Linux Upgrade Tool for Linux. A loader will be needed to be able to flash the backup image to the board. Download the loader from this link. Using this tool will flash the board and erase all previous data.
Enter Maskrom Mode in Axon using this video guide.
Setup the upgrade_tool using this guide. Only follow this guide for downloading and setting up upgrade_tool. Once downloaded, navigate to the directory of upgrade_tool.
Using
ldoption of upgrade_tool check whether Axon is being detected.
$ sudo ./upgrade_tool ld
List of rockusb connected(1)
DevNo=1 Vid=0x2207,Pid=0x350b,LocationID=213   Mode=Maskrom   SerialNo=
Use
dboption upgrade_tool to load the bootloader binary.
$ sudo ./upgrade_tool db /path/to/rk3588_spl_loader_v1.xx.xxx.bin
Download boot ok.
Now using the
wloption write the image to the board.
$ sudo ./upgrade_tool wl 0 /path/to/backup/axon_full_backupYYYYMMDD_HHMMSS.img
Start to write axon_full_backup20250712_112731.img at 0x0...
Write LBA from file (100%)
Finally reset the board using
rdoption with upgrade_tool. The backup image has been successfully flashed to the board.
$ sudo ./upgrade_tool rd
Reset Device OK.
Enter Maskrom Mode in Axon using this video guide.
Install USB Drivers-Assistant and RKDevTool using this guide. Only follow installation section and return to this document.
You will see
Found One MASKROM Devicemessage in the bottom left corner. If you seeNo Devices Found, it would mean device not in MASKROM mode.Click on
Download Imagetab and make the following changes. Correctly select paths for the Loader and Image generated during backup and then click onRun.
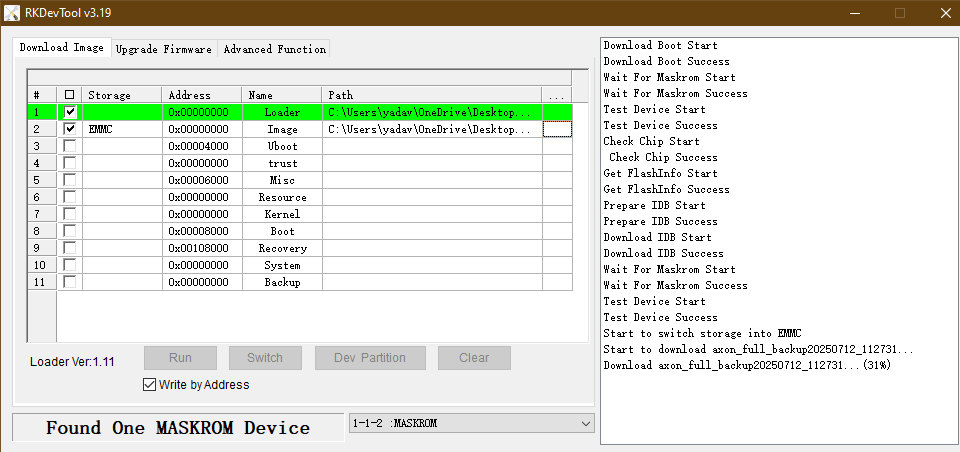
Flashing image has completed. The board should reset automatically. If it still shows
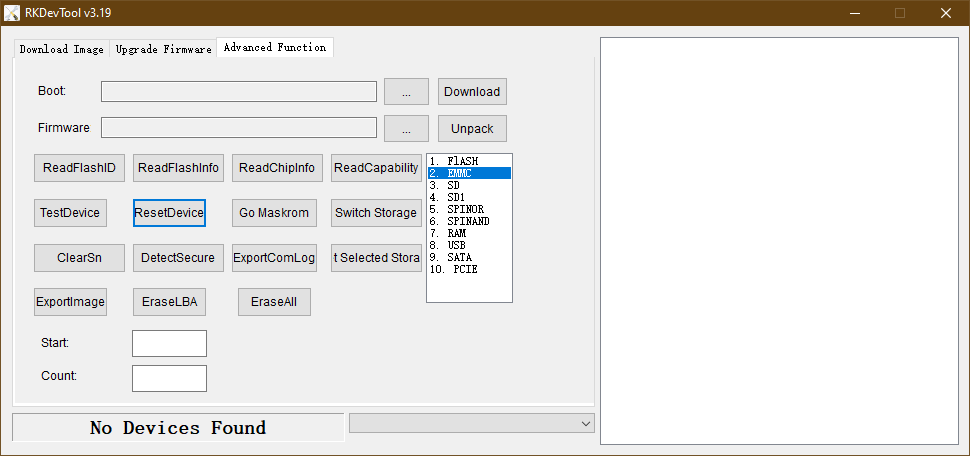
Found One MASKROM Devicemessage, navigate to theAdvanced Functiontab. Then click onResetDevice.
Using these commands install RKDevTool on MacOS.
% brew install automake autoconf libusb pkg-config git wget
% git clone https://github.com/rockchip-linux/rkdeveloptool
% cd rkdeveloptool
% autoreconf -i
% ./configure
% make -j $(nproc)
% cp rkdeveloptool /opt/homebrew/bin/
Enter Maskrom Mode in Axon using this video guide.
Use rkdeveloptool command with
ldoption to list available devices.
% rkdeveloptool ld
DevNo=1   Vid=0x2207,Pid=0x350b,LocationID=104   Maskrom
Use rkdeveloptool command with
dboption to load the bootloader in the device.
% rkdeveloptool db /path/to/rk3588_spl_loader_v1.xx.xxx.bin
Downloading bootloader succeeded.
Use rkdeveloptool command with
wloption to write the image from 0x0 address.
% rkdeveloptool wl 0 /path/to/axon_full_backupYYYYMMDD_HHMMSS.img
Write LBA from file (100%)
Use rkdeveloptool command with
rdoption to reset the device.
% rkdeveloptool rd
Reset Device OK.
Note
If you don’t have access to a Linux host, it is recommended to boot the board from a storage device other than the one where you want to restore the rootfs. For example, if you plan to copy the rootfs to the eMMC, boot the board from an alternative device such as an SD card, SATA drive, NVMe, or USB. Once booted, proceed with step 5 from the Linux guide and use the tar command to copy the rootfs.
You may use third-party tools to mount an ext4 filesystem like WinSCP on Windows and macFUSE on MacOS, but it is generally not recommended.
Connect Axon to a PC using a USB Cable.
Follow this Using Serial Console guide to serially connect to Axon.
Reboot the device and quickly press
Ctrl + cto enter the U-Boot console.From U-Boot Console type
ums 0 mmc 0. This will expose the eMMC as a USB connected to the host computer. If you have installed the OS in some other device like SD-Card or NVMe, you can usemmc listto find out the exact device number for that device. Replaceums 0 mmc 0byums 0 mmc <device-number>.
Warning
If you wish to remove the current root filesystem, ensure that you delete files only from the board’s 6th partition and not from any system-related partitions. Also make sure, not to delete the partition directory itself—remove only the files inside it.
Ensure that the rootfs (6th partition) is mounted, if not mount it manually using
mountcommand. If you want to remove current rootfs from the board then delete all the data from the mounted partition. Now usingtarcommand copy the contents of the compressed backup to the device. Then runsynccommand to flush the file system buffer, ensuring all the data is written to eMMC.
$ sudo tar -xvzf /path/to/axon_rootfs_backupYYYYMMDD_HHMMSS.tar.gz -C /path/to/rootfs_partition(6th partition)/of_device/
$ sync
Now, unmount all the mounted paritions of the exposed disk using the
umountcommand.Finally, go to the previously opened serial console of the board and end the ums process using
Ctrl + c. Then enter therebootcommand in the u-boot console. Your board will boot into the newly copied rootfs and all the data, packages, environments etc. will be restored.