SPI
Warning
We recommend to use Vicharak 6.1 kernel and latest Ubuntu 24.04 Noble Numbat , in order to support below overlays. Flash Image using this Documentation
sudo apt update
sudo apt reinstall linux-image-6.1.75-axon linux-headers-6.1.75-axon
Introduction
SPI (Serial Peripheral Interface) is a widely used protocol for communication between microcontrollers and peripheral devices like sensors, displays, and memory devices. Typically, SPI involves dedicated pins such as MOSI (Master Out Slave In), MISO (Master In Slave Out), SCLK (Serial Clock), and SS (Slave Select). In Axon, general-purpose I/O (GPIO) pins can be repurposed to function as SPI pins.
Axon provides 1 SPI1 ( Pin 17, 18, 19 and Pin 20 ) on GPIO Header.
Tip
To get more information on Axon GPIO Header.
Make Simple spidev1.0 device
How to use GPIO Pins as SPI Protocol ?
Steps to follow for Configuration
Open a terminal window (
Ctrl+Alt+T).Run command
sudo vicharak-configin it.Select
Overlaysoptions in it by pressingenterkey.
┌───────────────────────────────────┤ VICHARAK_CONFIG ├────────────────────────-───────────┐
│ Please select an option below:                                                           │
│                                                                                          │
│                                   System Maintanince                                     │
│                                       Hardware                                           │
│                                       Overlays                                           │
│                                     Connectivity                                         │
│                                   Advanced Options                                       │
│                                     User Settings                                        │
│                                     Localization                                         │
│                                         About                                            │
│                                                                                          │
│                      <Ok>                               <Cancel>                         │
│                                                                                          │
└──────────────────────────────────────────────────────────────────────────────────────────┘
You will see Warning Page, click on
yesand selectManage Overlaysoptions.
┌───────────────────────────────────┤ VICHARAK_CONFIG ├────────────────────────────────────┐
│ Configure Device Tree Overlay                                                            │
│                                                                                          │
│                                Manage overlays                                           │
│                                View overlay info                                         │
│                                Install 3rd party overlay                                 │
│                                Reset overlays                                            │
│                                                                                          │
│                                                                                          │
│                      <Ok>                               <Cancel>                         │
└──────────────────────────────────────────────────────────────────────────────────────────┘
Select overlays
( SPI1 )by pressingspacebaron keyboard, then selectOk.
┌──────────────────────────────────┤ VICHARAK_CONFIG ├─────────────────────────────────────┐
│ Please select overlays:                                                                  │
│                                                                                          │
│  [ ] Enable DP connector-split mode Axon V0.3                                            │
│  [ ] Enable RasPi Camera V1.3 (OV5647) on CSI0 D0,1 dphy1 Axon V0.3                      │
│  [ ] Enable RasPi Camera V1.3 (OV5647) on CSI0 D2,3 dphy2 Axon V0.3                      │
│  [ ] Enable RasPi Camera V1.3 (OV5647) on CSI1 D0,1 dphy4 Axon V0.3                      │
│  [ ] Enable RasPi Camera V1.3 (OV5647) on CSI1 D2,3 dphy5 Axon V0.3                      │
│  [ ] Enable RasPi Camera V1.3 (OV5647) on dphy RX0 Axon V0.3                             │
│  [ ] Enable RasPi camera V1.3 (OV5647) on dphy RX1 Axon V0.3                             │
│  [ ] Enable I2C1 on 30-Pin GPIO Header Axon V0.3                                         │
│  [ ] Enable I2C2 on 30-Pin GPIO Header Axon V0.3                                         │
│  [ ] Enable I2C5 on 30-Pin GPIO Header Axon V0.3                                         │
│  [ ] Enable I2C7 on 30-Pin GPIO Header Axon V0.3                                         │
│  [ ] Enable PWM0 on 30 Pin GPIO Header Axon V0.3                                         │
│  [ ] Enable PWM1_M0 on 30 Pin GPIO Header Axon V0.3                                      │
│  [ ] Enable PWM1_M0 on 30 Pin GPIO Header Axon V0.3                                      │
│  [*] Enable SPI1 on 30 Pin GPIO Header Axon V0.3                                         │
│  [ ] Enable UART1 on 30 Pin GPIO Header Axon V0.3                                        │
│  [ ] Enable UART4 on 30 Pin GPIO Header Axon V0.3                                        │
│  [ ] Enable UART6 on 30 Pin GPIO Header Axon V0.3                                        │
│  [ ] Enable Waveshare 4inch DSI LCD DPHY TX0 Axon V0.3                                   │
│  [ ] Enable Waveshare 4inch DSI LCD DPHY TX1 Axon V0.3                                   │
│                                                                                          │
│                                                                                          │
│                                                                                          │
│                                                                                          │
│                                                                                          │
│                     <Ok>                         <Cancel>                                │
│                                                                                          │
└──────────────────────────────────────────────────────────────────────────────────────────┘
To return back to terminal, press the
Esckey until you exit from it.In order to enable your configuration, Restart your computer or Run command
sudo rebootin terminal.
Check generated Device
Open terminal. (
Ctrl + Alt + t)Run below command :
ls -l /dev/spidev*
You will find /dev/spidev1.0 device is created in /dev directory.
ENC28J60 Ethernet Controller with SPI Support
The ENC28J60 is a standalone Ethernet controller with an SPI (Serial Peripheral Interface) bus, designed by Microchip Technology. It is widely used to provide Ethernet connectivity to microcontrollers and embedded systems that do not have built-in Ethernet capabilities.
Tip
You can get more details from ENC28J60 Datasheet
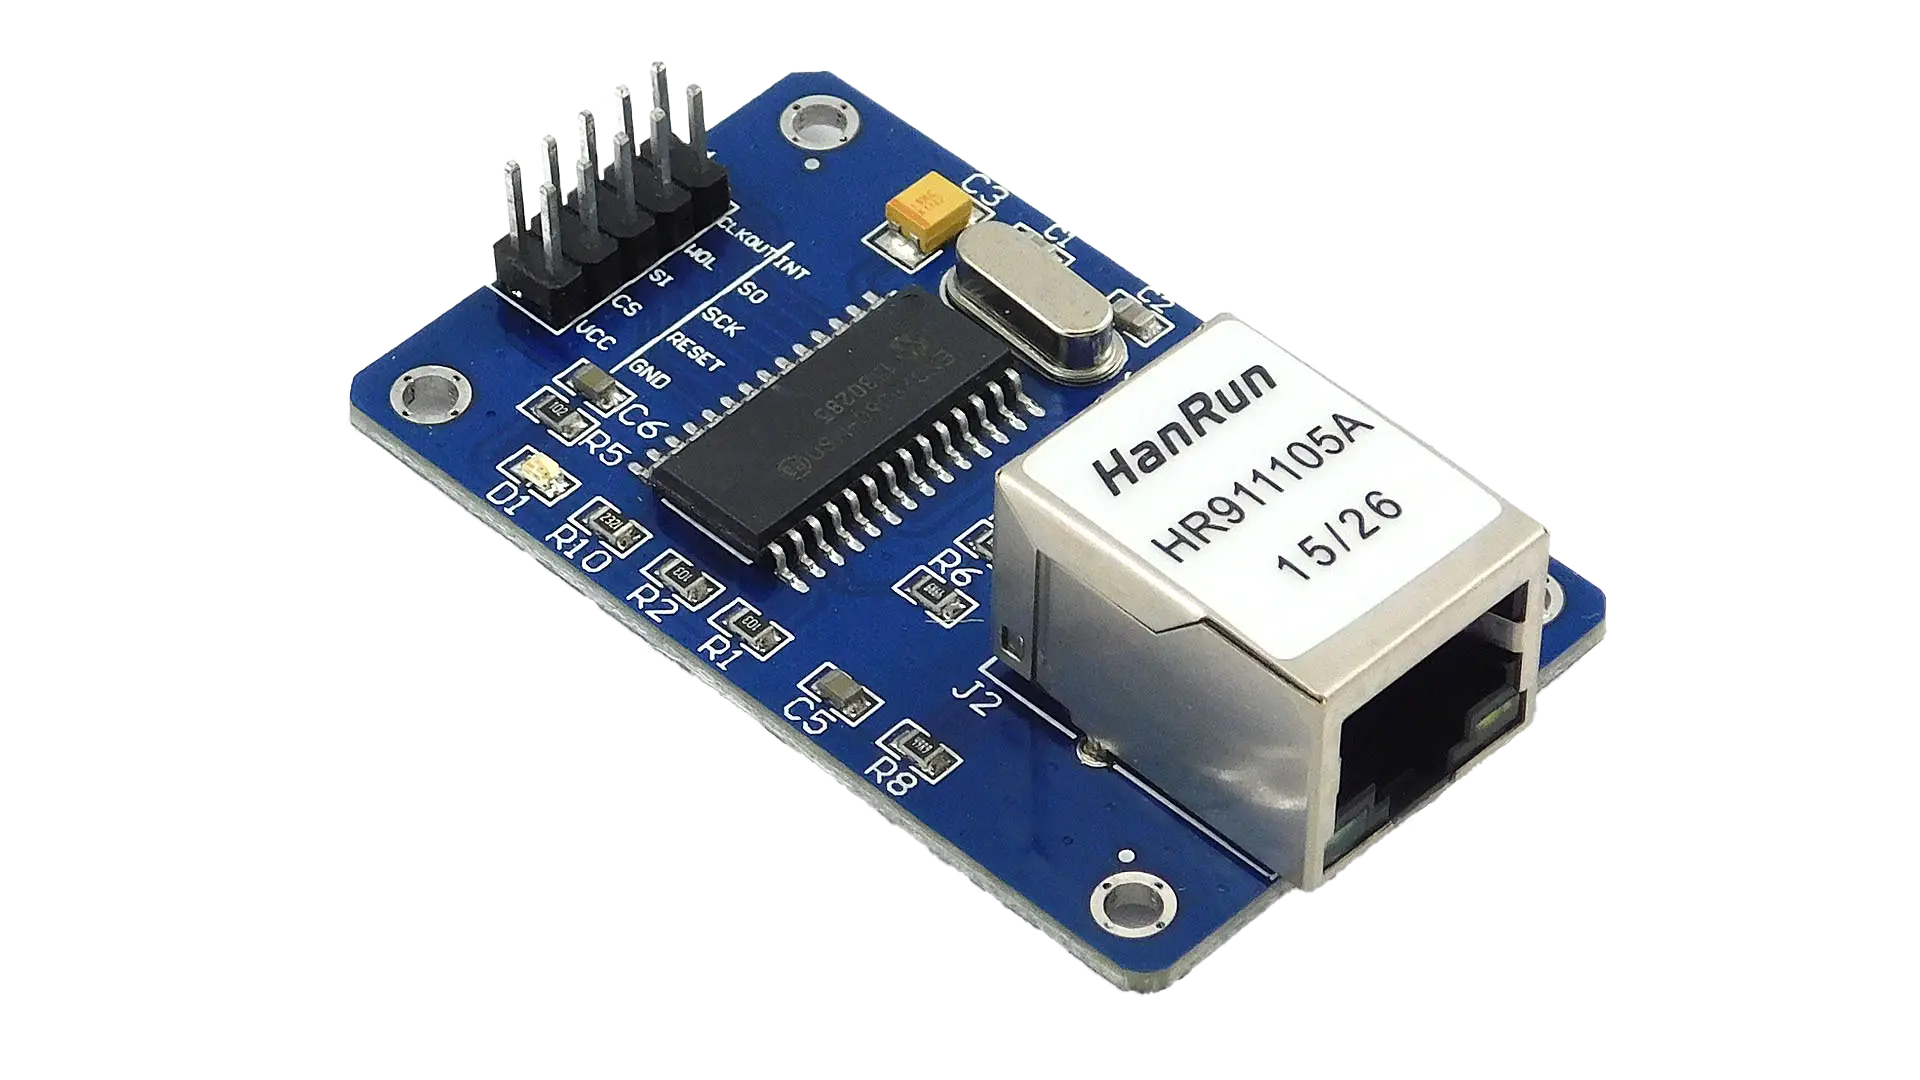
Physical Connection
ENC28J60 Pin |
Axon Header GPIO Pin |
|---|---|
GND |
Pin 8 |
3.3V |
Pin 14 |
SO ( Slave Out ) |
Pin 17 ( GPIO1_D0 ) |
SI ( Slave In ) |
Pin 18 ( GPIO1_D1 ) |
CS ( Chip select ) |
Pin 19 ( GPIO1_D3 ) |
SCK ( Clock ) |
Pin 20 ( GPIO1_D2 ) |
INT ( Interrupt ) |
Pin 23 ( GPIO1_B3 ) |
Turn on overlay
Steps to follow for Configuration
Open a terminal window (
Ctrl+Alt+T).Run command
sudo vicharak-configin it.Select
Overlaysoptions in it by pressingenterkey.
┌───────────────────────────────────┤ VICHARAK_CONFIG ├────────────────────────-───────────┐
│ Please select an option below:                                                           │
│                                                                                          │
│                                   System Maintanince                                     │
│                                       Hardware                                           │
│                                       Overlays                                           │
│                                     Connectivity                                         │
│                                   Advanced Options                                       │
│                                     User Settings                                        │
│                                     Localization                                         │
│                                         About                                            │
│                                                                                          │
│                      <Ok>                               <Cancel>                         │
│                                                                                          │
└──────────────────────────────────────────────────────────────────────────────────────────┘
You will see Warning Page, click on
yesand selectManage Overlaysoptions.
┌───────────────────────────────────┤ VICHARAK_CONFIG ├────────────────────────────────────┐
│ Configure Device Tree Overlay                                                            │
│                                                                                          │
│                                Manage overlays                                           │
│                                View overlay info                                         │
│                                Install 3rd party overlay                                 │
│                                Reset overlays                                            │
│                                                                                          │
│                                                                                          │
│                      <Ok>                               <Cancel>                         │
└──────────────────────────────────────────────────────────────────────────────────────────┘
Select overlay of
( ENC28J60 Ethernet Controller With SPI )by pressingspacebaron keyboard, then selectOk.
┌──────────────────────────────────┤ VICHARAK_CONFIG ├─────────────────────────────────────┐
│ Please select overlays:                                                                  │
│                                                                                          │
│  [ ] Enable DP connector-split mode Axon V0.3                                            │
│  [ ] Enable RasPi Camera V1.3 (OV5647) on CSI0 D0,1 dphy1 Axon V0.3                      │
│  [ ] Enable RasPi Camera V1.3 (OV5647) on CSI0 D2,3 dphy2 Axon V0.3                      │
│  [ ] Enable RasPi Camera V1.3 (OV5647) on CSI1 D0,1 dphy4 Axon V0.3                      │
│  [ ] Enable RasPi Camera V1.3 (OV5647) on CSI1 D2,3 dphy5 Axon V0.3                      │
│  [ ] Enable RasPi Camera V1.3 (OV5647) on dphy RX0 Axon V0.3                             │
│  [ ] Enable RasPi camera V1.3 (OV5647) on dphy RX1 Axon V0.3                             │
│  [ ] Enable I2C1 on 30-Pin GPIO Header Axon V0.3                                         │
│  [ ] Enable I2C2 on 30-Pin GPIO Header Axon V0.3                                         │
│  [ ] Enable I2C5 on 30-Pin GPIO Header Axon V0.3                                         │
│  [ ] Enable I2C7 on 30-Pin GPIO Header Axon V0.3                                         │
│  [ ] Enable PWM0 on 30 Pin GPIO Header Axon V0.3                                         │
│  [ ] Enable PWM1_M0 on 30 Pin GPIO Header Axon V0.3                                      │
│  [ ] Enable PWM1_M0 on 30 Pin GPIO Header Axon V0.3                                      │
│  [ ] Enable SPI1 on 30 Pin GPIO Header Axon V0.3                                         │
│  [*] Enable SPI1 ENC28J60 Ethernet Controller support on 30 Pin GPIO Header Axon V0.3    │
│  [ ] Enable UART1 on 30 Pin GPIO Header Axon V0.3                                        │
│  [ ] Enable UART4 on 30 Pin GPIO Header Axon V0.3                                        │
│  [ ] Enable UART6 on 30 Pin GPIO Header Axon V0.3                                        │
│  [ ] Enable Waveshare 4inch DSI LCD DPHY TX0 Axon V0.3                                   │
│  [ ] Enable Waveshare 4inch DSI LCD DPHY TX1 Axon V0.3                                   │
│                                                                                          │
│                                                                                          │
│                                                                                          │
│                                                                                          │
│                                                                                          │
│                     <Ok>                         <Cancel>                                │
│                                                                                          │
└──────────────────────────────────────────────────────────────────────────────────────────┘
To return back to terminal, press the
Esckey until you exit from it.In order to enable your configuration, Restart your computer or Run command
sudo rebootin terminal.
Check ethernet interface
You can get one more interface other than default ethernet interface. As in our case, eth1 is generated.
vicharak@vicharak:~$ ip a
1: lo: <LOOPBACK,UP,LOWER_UP> mtu 65536 qdisc noqueue state UNKNOWN group default qlen 1000
    link/loopback 00:00:00:00:00:00 brd 00:00:00:00:00:00
    inet 127.0.0.1/8 scope host lo
       valid_lft forever preferred_lft forever
    inet6 ::1/128 scope host noprefixroute
       valid_lft forever preferred_lft forever
2: dummy0: <BROADCAST,NOARP> mtu 1500 qdisc noop state DOWN group default qlen 1000
    link/ether 52:71:ea:c2:44:2c brd ff:ff:ff:ff:ff:ff
3: end1: <BROADCAST,MULTICAST,UP,LOWER_UP> mtu 1500 qdisc mq state UP group default qlen 1000
    link/ether 6e:21:27:df:96:f8 brd ff:ff:ff:ff:ff:ff
4: eth1: <BROADCAST,MULTICAST,UP,LOWER_UP> mtu 1500 qdisc pfifo_fast state UNKNOWN group default qlen 1000
    link/ether 52:3b:9c:26:d3:c4 brd ff:ff:ff:ff:ff:ff
    inet 192.168.1.46/24 brd 192.168.1.255 scope global dynamic noprefixroute eth1
       valid_lft 86177sec preferred_lft 86177sec
    inet6 2401:4900:1f3f:e774:bed3:3a12:c3c4:9a5f/64 scope global temporary dynamic
       valid_lft 84992sec preferred_lft 84992sec
    inet6 2401:4900:1f3f:e774:9b4:6c9d:8709:8f9f/64 scope global dynamic mngtmpaddr noprefixroute
       valid_lft 84992sec preferred_lft 84992sec
    inet6 fe80::10a3:96a7:93bb:9554/64 scope link noprefixroute
       valid_lft forever preferred_lft forever
5: wlan0: <NO-CARRIER,BROADCAST,MULTICAST,UP> mtu 1500 qdisc mq state DOWN group default qlen 1000
    link/ether 40:f4:c9:94:85:18 brd ff:ff:ff:ff:ff:ff