UART
Warning
We recommend to use Vicharak 6.1 kernel and latest Ubuntu 24.04 Noble Numbat , in order to support below overlays. Flash Image using this Documentation
sudo apt update
sudo apt reinstall linux-image-6.1.75-axon linux-headers-6.1.75-axon
Introduction
Many embedded boards provide the flexibility to configure GPIO pins to function as UART interfaces, enabling communication between the board and peripheral devices such as sensors, displays, and computers.
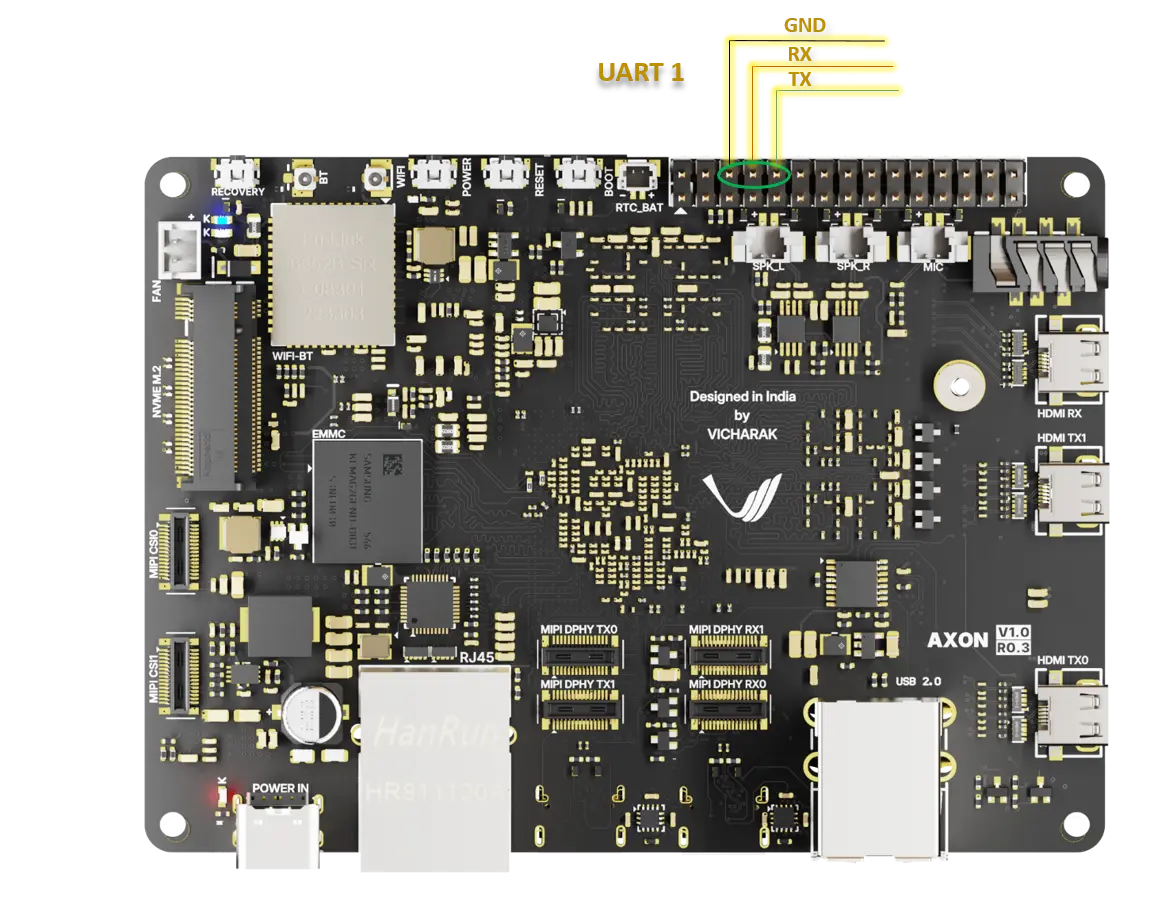
This guide explains how to configure GPIO pins as UART on Axon 30 Pins GPIO Header. By converting GPIO pins into UART transmit (TX) and receive (RX) pins, the board can be used for serial communication, expanding the range of connected devices. This configuration is useful when there is no dedicated UART hardware interface available or when additional UART ports are needed.
Axon provides total 4 UARTs including one specific UART_2 ( Pin 2 and Pin 4 ) for debugging on GPIO Header, Like
UART_1, UART_4, UART_6.
Tip
To get more information on Axon GPIO Header.
How to use GPIO Pins as UART Protocol ?
Steps to follow for Configuration
Open a terminal window (
Ctrl+Alt+T).Run command
sudo vicharak-configin it.Select
Overlaysoptions in it by pressingenterkey.
┌───────────────────────────────────┤ VICHARAK_CONFIG ├────────────────────────-───────────┐
│ Please select an option below:                                                           │
│                                                                                          │
│                                   System Maintanince                                     │
│                                       Hardware                                           │
│                                       Overlays                                           │
│                                     Connectivity                                         │
│                                   Advanced Options                                       │
│                                     User Settings                                        │
│                                     Localization                                         │
│                                         About                                            │
│                                                                                          │
│                      <Ok>                               <Cancel>                         │
│                                                                                          │
└──────────────────────────────────────────────────────────────────────────────────────────┘
You will see Warning Page, click on
yesand selectManage Overlaysoptions.
┌───────────────────────────────────┤ VICHARAK_CONFIG ├────────────────────────────────────┐
│ Configure Device Tree Overlay                                                            │
│                                                                                          │
│                                Manage overlays                                           │
│                                View overlay info                                         │
│                                Install 3rd party overlay                                 │
│                                Reset overlays                                            │
│                                                                                          │
│                                                                                          │
│                      <Ok>                               <Cancel>                         │
└──────────────────────────────────────────────────────────────────────────────────────────┘
Select overlays as per your requirement
( UART1 / UART4 / UART6 )by pressingspacebaron keyboard, then selectOk.
┌──────────────────────────────────┤ VICHARAK_CONFIG ├─────────────────────────────────────┐
│ Please select overlays:                                                                  │
│                                                                                          │
│  [ ] Enable DP connector-split mode Axon V0.3                                            │
│  [ ] Enable RasPi Camera V1.3 (OV5647) on CSI0 D0,1 dphy1 Axon V0.3                      │
│  [ ] Enable RasPi Camera V1.3 (OV5647) on CSI0 D2,3 dphy2 Axon V0.3                      │
│  [ ] Enable RasPi Camera V1.3 (OV5647) on CSI1 D0,1 dphy4 Axon V0.3                      │
│  [ ] Enable RasPi Camera V1.3 (OV5647) on CSI1 D2,3 dphy5 Axon V0.3                      │
│  [ ] Enable RasPi Camera V1.3 (OV5647) on dphy RX0 Axon V0.3                             │
│  [ ] Enable RasPi camera V1.3 (OV5647) on dphy RX1 Axon V0.3                             │
│  [ ] Enable I2C1 on 30-Pin GPIO Header Axon V0.3                                         │
│  [ ] Enable I2C2 on 30-Pin GPIO Header Axon V0.3                                         │
│  [ ] Enable I2C5 on 30-Pin GPIO Header Axon V0.3                                         │
│  [ ] Enable I2C7 on 30-Pin GPIO Header Axon V0.3                                         │
│  [ ] Enable PWM0 on 30 Pin GPIO Header Axon V0.3                                         │
│  [ ] Enable PWM1_M0 on 30 Pin GPIO Header Axon V0.3                                      │
│  [ ] Enable PWM1_M0 on 30 Pin GPIO Header Axon V0.3                                      │
│  [*] Enable UART1 on 30 Pin GPIO Header Axon V0.3                                        │
│  [ ] Enable UART4 on 30 Pin GPIO Header Axon V0.3                                        │
│  [ ] Enable UART6 on 30 Pin GPIO Header Axon V0.3                                        │
│  [ ] Enable Waveshare 4inch DSI LCD DPHY TX0 Axon V0.3                                   │
│  [ ] Enable Waveshare 4inch DSI LCD DPHY TX1 Axon V0.3                                   │
│                                                                                          │
│                                                                                          │
│                                                                                          │
│                                                                                          │
│                                                                                          │
│                     <Ok>                         <Cancel>                                │
│                                                                                          │
└──────────────────────────────────────────────────────────────────────────────────────────┘
To return back to terminal, press the
Esckey until you exit from it.In order to enable your configuration, Restart your computer or Run command
sudo rebootin terminal.
How to check tty serial device ?
Open terminal. (
Ctrl + Alt + t)Run below command :
ls -l /dev/ttyS*
If you have turned on UART1 then device /dev/ttyS1 will be generated.
Note
/dev/ttyS9 device is specific for bluetooth, you can find another devices.
Example
UART 1 Configuration
Serial (USB To UART Module) FTDI Pin |
Header GPIO Pin |
Schematic Name |
|---|---|---|
GND |
Pin 8 |
GND |
TX |
Pin 10 (GPIO2_B6) |
UART1_RX_M0 |
RX |
Pin 12 (GPIO2_B7) |
UART1_TX_M0 |
Running the Serial Console Program
Install GTK-Term
sudo apt update
sudo apt install gtkterm
Open the GTK-Term program and configure the serial parameters.
sudo gtkterm
On the Configuration menu, click on Port.
Select the serial port number and configure the serial parameters as shown in the image below.
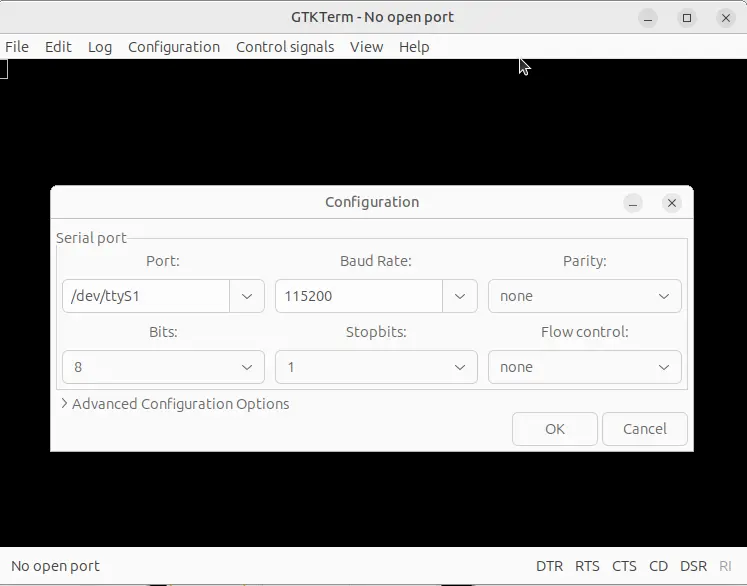
Click on the OK button to open the serial console.
You will now be able to access the serial console.
Note
Set Port and Baudrate according to peripheral requirement.
Install Minicom
sudo apt update
sudo apt install minicom
Open Minicom
sudo minicom -b <BaudRate> -D /dev/ttyS<UART_DEVICE_NUMBER>
Note
-b is for Baud Rate.
-D is for UART tty device.
To Close Minicom Type, Ctrl + A then z, And Press q and Select Enter.
Download and install the PuTTY program.
Open the PuTTY program and configure the serial parameters as shown in the image below.
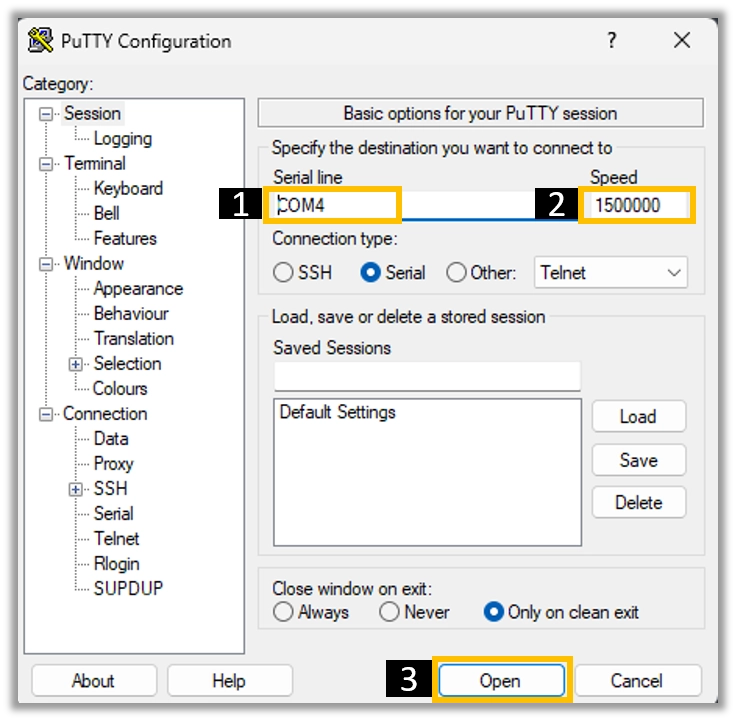
Click on the Open button to open the serial console.
You will now be able to access the serial console.