PCIe 2.0
Warning
We recommend using Vicharak 6.1 kernel and latest Ubuntu 24.04 Noble Numbat in order to support the overlays below. Flash Image using this Documentation
sudo apt update
sudo apt reinstall linux-image-6.1.75-axon linux-headers-6.1.75-axon
Introduction
PCIe 2.0 (Peripheral Component Interconnect Express) is a high speed, serial bus standard that supports point-to-point communication between a host and peripherals like SSDs, Network Cards and FPGAs. PCIe 2.0 utilizes the following signal lines for data transmission and control:
Transmit Differential Pair (TX±): Carries high-speed data from the device to the host.
Receive Differential Pair (RX±): Carries high-speed data from the host to the device.
Reference Clock Pair (REFCLK±): Supplies a differential reference clock for data synchronization and serialization.
PCIe Reset (PERST#): Active-low signal to reset the PCIe interface logic on the device.
Wake Request (WAKE#, optional): Allows the device to signal the host to transition from a low-power state to an active state.
Clock Request (CLKREQ#, optional): Used by the device to request a clock from the host when transitioning from low-power to active state. May require
supports-clkreqto be enabled in the PCIe node of the device tree.
PCIe 2.0 Implementation on Axon
Axon provides support for 2 PCIe 2.0 (x1) Controllers. These controllers are operated by devices known as Combo PHYs. Combo PHYs can provide for multiple protocols like PCIe, SATA or USB3.0 using the same physical pins. Following table explains relation between Combo PHY and protocols supported:
PHY |
Supported Protocols |
Default Protocol |
Constraints |
|---|---|---|---|
Combo PHY 0
|
PCIe 2.0: SATA: |
|
Only SATA can be used |
Combo PHY 1
|
PCIe 2.0: SATA: |
|
All supported protocols can be used |
Combo PHY 2
|
PCIe 2.0: SATA: USB3.0: |
|
All supported protocols can be used |
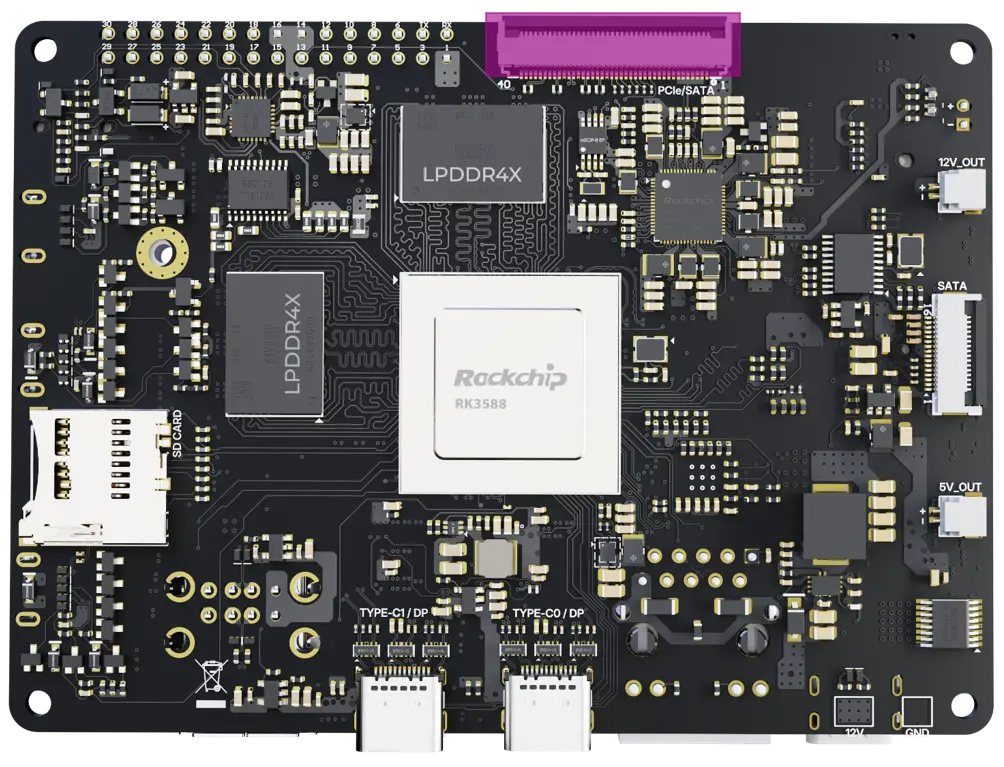
The PCIe 2.0 Controllers from the Axon can be accessed via the 40-pin Flex Cable.
FPC Pin-out
The FPC Cable is a 40-pin connector that can be used to connect the Axon to daughter extension boards for accessing the PCIe communication protocol. Given below is the pinout of the FPC Connector:
Pin# |
Function |
Pin# |
Function |
Pin# |
Function |
Pin# |
Function |
|---|---|---|---|---|---|---|---|
1 |
GND |
11 |
GND |
21 |
PCIeX1_1_PERSTn_M1_L |
31 |
GND |
2 |
VCC_3.3V |
12 |
GND |
22 |
GND |
32 |
PCIe20_1_RX_P |
3 |
VCC_3.3V |
13 |
PCIe_PWREN_H |
23 |
PCIe20_0_TX_P |
33 |
PCIe20_1_RX_N |
4 |
VCC_3.3V |
14 |
GND |
24 |
PCIe20_0_TX_N |
34 |
GND |
5 |
VCC_3.3V |
15 |
PCIeX1_0_CLKREQn_M1_L |
25 |
GND |
35 |
PCIe20_1_TX_P |
6 |
VCC_3.3V |
16 |
PCIeX1_0_WAKEn_M1_L |
26 |
PCIe20_0_RX_P |
36 |
PCIe20_1_TX_N |
7 |
VCC_3.3V |
17 |
PCIeX1_0_PERSTn_M1_L |
27 |
PCIe20_0_RX_N |
37 |
GND |
8 |
GND |
18 |
GND |
28 |
GND |
38 |
PCIe20_1_REFCLK_P |
9 |
GND |
19 |
PCIeX1_1_CLKREQn_M1_L |
29 |
PCIe20_0_REFCLK_P |
39 |
PCIe20_1_REFCLK_N |
10 |
GND |
20 |
PCIeX1_1_WAKEn_M1_L |
30 |
PCIe20_0_REFCLK_N |
40 |
GND |
Some extension boards have been designed for accessing PCIe protocol, these are discussed later. These are the details of the FPC cable and connector used:
FPC Cable
40 Pin
0.5 mm pitch
Impedance: 85 Ohm
Warning
The ▼ symbol can be found near the FPC Connector on the daughter board. This indicates the first pin of the Flex Connector. Make sure to connect this pin to the pin marked as 1 on the Axon side connector.
FPC Connector
40 Pin
0.5 mm pitch
Current rating (max): 0.5 A per pin
MPN: FPC-05F-40PH20
Warning
A Combo PHY supports only one protocol at a time.
For instance, if Combo PHY 2 is configured to operate as USB 3.0, it cannot simultaneously function as a PCIe interface. However, if USB 3.0 is not in use, the same PHY can be reconfigured to support PCIe communication instead.
Combo PHY 1 and 2 are configured for PCIe use by default, provided that no other overlays are conflicting with Combo PHY to be used. Always verify the current overlay configuration to confirm which protocol is active for each Combo PHY. To use PCIe , ensure that no other overlay is enabled for the same Combo PHY. The following section provides more details:
Verifying Absence of Conflicting Device Tree Overlays
Steps to follow for Configuration
Open a terminal window (
Ctrl+Alt+T).Run command
sudo vicharak-configin it.Select
Overlaysoptions in it by pressingenterkey.
┌───────────────────────────────────┤ VICHARAK_CONFIG ├────────────────────────────────────┐
│ Please select an option below:                                                           │
│                                                                                          │
│                                   System Maintenance                                     │
│                                       Hardware                                           │
│                                       Overlays                                           │
│                                     Connectivity                                         │
│                                   Advanced Options                                       │
│                                     User Settings                                        │
│                                     Localization                                         │
│                                         About                                            │
│                                                                                          │
│                      <Ok>                               <Cancel>                         │
│                                                                                          │
└──────────────────────────────────────────────────────────────────────────────────────────┘
You will see Warning Page, click on
yesand selectManage Overlaysoption.
┌───────────────────────────────────┤ VICHARAK_CONFIG ├────────────────────────────────────┐
│ Configure Device Tree Overlay                                                            │
│                                                                                          │
│                                Manage overlays                                           │
│                                View overlay info                                         │
│                                Install 3rd party overlay                                 │
│                                Reset overlays                                            │
│                                                                                          │
│                                                                                          │
│                      <Ok>                               <Cancel>                         │
└──────────────────────────────────────────────────────────────────────────────────────────┘
First, identify which PCIe 2.0 Lane you want to use. This information will be indicated on the expansion board you are using. Suppose you are using the PCIe 2.0 Lane 1 which is associated with Combo PHY 2. Then you need to make sure that any overlays related to Combo PHY 2 are disabled.
For using PCIe 2.0 Lane 1 which is associated with Combo PHY 2 the following overlays should be disabled:
USB3.0 support on Combo PHY 2Sata support on Combo PHY 2
For using PCIe 2.0 Lane 0 which is associated with Combo PHY 1 this overlay should be disabled:
Sata support on Combo PHY 1
Note
Refer the table under PCIe 2.0 Implementation on Axon Section for understanding relation between Combo PHYs and compatible protocols.
┌──────────────────────────────────┤ VICHARAK_CONFIG ├─────────────────────────────────────┐
│ Please select overlays:                                                                  │
│                                                                                          │
│  [ ] Enable DP connector-split mode Axon V0.3                                            │
│  [ ] Enable Sata support on Combo PHY 1 on Axon V0.3                                     │
│  [ ] Enable Sata support on Combo PHY 2 on Axon V0.3                                     │
│  [ ] Enable USB3.0 support on Combo PHY 2 on Axon V0.3                                   │
│  [ ] Enable RasPi Camera V1.3 (OV5647) on CSI0 D0,1 dphy1 Axon V0.3                      │
│  [ ] Enable RasPi Camera V1.3 (OV5647) on CSI0 D2,3 dphy2 Axon V0.3                      │
│  [ ] Enable RasPi Camera V1.3 (OV5647) on CSI1 D0,1 dphy4 Axon V0.3                      │
│  [ ] Enable RasPi Camera V1.3 (OV5647) on CSI1 D2,3 dphy5 Axon V0.3                      │
│  [ ] Enable RasPi Camera V1.3 (OV5647) on dphy RX0 Axon V0.3                             │
│  [ ] Enable RasPi camera V1.3 (OV5647) on dphy RX1 Axon V0.3                             │
│  [ ] Enable I2C1 on 30-Pin GPIO Header Axon V0.3                                         │
│  [ ] Enable I2C2 on 30-Pin GPIO Header Axon V0.3                                         │
│  [ ] Enable I2C5 on 30-Pin GPIO Header Axon V0.3                                         │
│  [ ] Enable I2C7 on 30-Pin GPIO Header Axon V0.3                                         │
│  [ ] Enable PWM0 on 30 Pin GPIO Header Axon V0.3                                         │
│  [ ] Enable PWM1_M0 on 30 Pin GPIO Header Axon V0.3                                      │
│  [ ] Enable PWM1_M0 on 30 Pin GPIO Header Axon V0.3                                      │
│  [ ] Enable SPI1 on 30 Pin GPIO Header Axon V0.3                                         │
│  [ ] Enable UART1 on 30 Pin GPIO Header Axon V0.3                                        │
│  [ ] Enable UART4 on 30 Pin GPIO Header Axon V0.3                                        │
│  [ ] Enable UART6 on 30 Pin GPIO Header Axon V0.3                                        │
│  [ ] Enable Waveshare 4inch DSI LCD DPHY TX0 Axon V0.3                                   │
│  [ ] Enable Waveshare 4inch DSI LCD DPHY TX1 Axon V0.3                                   │
│                                                                                          │
│                                                                                          │
│                                                                                          │
│                                                                                          │
│                                                                                          │
│                     <Ok>                         <Cancel>                                │
│                                                                                          │
└──────────────────────────────────────────────────────────────────────────────────────────┘
To return back to terminal, keep pressing the
Esckey until you exit from it.In order to enable your configuration, Restart your board or Run command
sudo rebootin terminal.
Checking success of PCIe Communication
Warning
Many embedded platforms and PCIe devices do not support hot plugging. Ensure the device is connected before powering on or initializing the board.
Always load device-specific drivers and firmware. While the PCIe link may establish without drivers or firmware, most devices will not enumerate or function correctly unless the appropriate driver and firmware are installed.
The lspci command can be used to check whether the PCIe device has completed training and a link has been established. In this case both PCIe controllers are enabled and WiFi Cards are connected to them.
vicharak@vicharak:~$ lspci
0002:20:00.0 PCI bridge: Rockchip Electronics Co., Ltd RK3588 (rev 01)
0002:21:00.0 Network controller: Intel Corporation Wi-Fi 6E(802.11ax) AX210/AX1675* 2x2 [Typhoon Peak] ()
0003:30:00.0 PCI bridge: Rockchip Electronics Co., Ltd RK3588 (rev 01)
0003:31:00.0 Network controller: Intel Corporation Wireless 7260 (rev 73)
The dmesg | grep pcie command can be used to debug whether PCIe link has been correctly initialized. The output shown below denotes successful initialization of PCIe Link for both controllers.
vicharak@vicharak:~$ dmesg | grep pcie
[    4.278553] rk-pcie fe180000.pcie: PCIe Link up, LTSSM is 0x30011
[    4.278568] rk-pcie fe180000.pcie: PCIe Gen.1 x1 link up
[    4.278693] rk-pcie fe180000.pcie: PCI host bridge to bus 0003:30
[    4.286549] rk-pcie fe170000.pcie: PCIe Link up, LTSSM is 0x130011
[    4.286557] rk-pcie fe170000.pcie: PCIe Gen.2 x1 link up
[    4.287843] rk-pcie fe170000.pcie: PCI host bridge to bus 0002:20
[    4.305066] pcieport 0003:30:00.0: PME: Signaling with IRQ 100
[    4.315772] pcieport 0002:20:00.0: PME: Signaling with IRQ 110
Note
fe170000.pcie corresponds to PCIe 2.0 Lane 0
fe180000.pcie corresponds to PCIe 2.0 Lane 1
Extension Boards via Flex Connector
The following PCIe extension boards were designed for validating PCIe interface functionality using Wi-Fi modules such as the Intel Wireless-N 7260, Intel AX210NGW, and the E1000 NVMe SSD. The usage of these boards is described below.
E-Key and Mini PCIe Dual-Connector Extension Board
The Intel Wireless-N 7260HMW BN and Intel AX210NGW have been used for testing the extension board. The steps to make these two WiFi cards work using PCIe 2.0 Lanes are almost similar. The steps which are a bit different will be mentioned using separate tabs for different cards.
Note
M.2 E Key connector is routed to PCIe 2.0 Lane 0
Mini PCIe connector is routed to PCIe 2.0 Lane 1
Verify proper overlay setting using this guide
Verifying presence of required iwlwifi drivers
If you have updated the kernel to latest version iwlwifi and iwlmvm kernel modules should be present in the system. Use modinfo command to verify their presence.
vicharak@vicharak:~$ modinfo iwlmvm
vicharak@vicharak:~$ modinfo iwlwifi
These modules automatically load when a compatible Intel WiFi Card is detected. After ensuring drivers are present, connect the Axon to a compatible extension board using an FPC Cable, then insert the WiFi card. Now reboot the board.
vicharak@vicharak:~$ sudo reboot
Note
The iwlwifi and iwlmvm modules are drivers for recent Intel Wi-Fi cards.
If you’re using an older Intel card or a card from another vendor, you may need to add the necessary drivers for your specific hardware.
Downloading iwlwifi firmware
Once the board is rebooted, check kernel logs to find the firmware version.
vicharak@vicharak:~$ dmesg | grep iwlwifi
[    7.765297] iwlwifi 0003:31:00.0: enabling device (0000 -> 0002)
[    7.770321] iwlwifi 0003:31:00.0: Direct firmware load for iwlwifi-7260-17.ucode failed with error -2
[    7.770332] iwlwifi 0003:31:00.0: Falling back to sysfs fallback for: iwlwifi-7260-17.ucode
[    7.801670] iwlwifi 0003:31:00.0: no suitable firmware found!
[    7.801699] iwlwifi 0003:31:00.0: iwlwifi-7260-17 is required
[    7.801707] iwlwifi 0003:31:00.0: check git://git.kernel.org/pub/scm/linux/kernel/git/firmware/linux-firmware.git
This shows that iwlwifi-7260-17.ucode is the required firmware version.
If you are using a different Intel card, the firmware version may differ.
Download the firmware using the wget command, then copy the .ucode file to /lib/firmware:
vicharak@vicharak:~$ wget https://git.kernel.org/pub/scm/linux/kernel/git/firmware/linux-firmware.git/plain/iwlwifi-7260-17.ucode
vicharak@vicharak:~$ sudo cp iwlwifi-7260-17.ucode /lib/firmware
All iwlwifi firmware is downloaded from the same GitHub repository. Only the firmware name needs to be changed.
Now reboot the board for the system to load the firmware. Using dmesg, check whether the firmware is loaded correctly:
vicharak@vicharak:~$ dmesg | grep iwlwifi
[    7.738904] iwlwifi 0003:31:00.0: enabling device (0000 -> 0002)
[    7.751253] iwlwifi 0003:31:00.0: loaded firmware version 17.3216344376.0 7260-17.ucode op_mode iwlmvm
[    7.760424] iwlwifi 0003:31:00.0: Detected Intel(R) Wireless N 7260, REV=0x144
[    7.788782] iwlwifi 0003:31:00.0: base HW address: 80:86:f2:35:11:0a, OTP minor version: 0x0
[    8.031453] iwlwifi 0003:31:00.0 wlP3p49s0: renamed from wlan1
Once it is rebooted, check kernel logs to find the firmware version.
vicharak@vicharak:~$ dmesg | grep iwlwifi
[    7.880506] iwlwifi 0002:21:00.0: Direct firmware load for iwlwifi-ty-a0-gf-a0-72.ucode failed with error -2
[    7.880508] iwlwifi 0002:21:00.0: Falling back to sysfs fallback for: iwlwifi-ty-a0-gf-a0-72.ucode
[    7.880809] iwlwifi 0002:21:00.0: Direct firmware load for iwlwifi-ty-a0-gf-a0-39.ucode failed with error -2
[    7.880811] iwlwifi 0002:21:00.0: Falling back to sysfs fallback for: iwlwifi-ty-a0-gf-a0-39.ucode
[    7.881155] iwlwifi 0002:21:00.0: no suitable firmware found!
[    7.881165] iwlwifi 0002:21:00.0: minimum version required: iwlwifi-ty-a0-gf-a0-39
[    7.881168] iwlwifi 0002:21:00.0: maximum version supported: iwlwifi-ty-a0-gf-a0-72
[    7.881171] iwlwifi 0002:21:00.0: check git://git.kernel.org/pub/scm/linux/kernel/git/firmware/linux-firmware.git
This shows that iwlwifi did not find suitable firmware. It also mentions the maximum iwlwifi-ty-a0-gf-a0-72.ucode and minimum iwlwifi-ty-a0-gf-a0-39.ucode. This card also requires a .pnvm file for correct functioning of firmware.
If you are using a different Intel card, the firmware version may differ.
Download the firmware (.ucode and .pnvm for this card) using the wget command, then copy the files to /lib/firmware:
vicharak@vicharak:~$ wget https://git.kernel.org/pub/scm/linux/kernel/git/firmware/linux-firmware.git/plain/{iwlwifi-ty-a0-gf-a0-72.ucode,iwlwifi-ty-a0-gf-a0.pnvm}
vicharak@vicharak:~$ sudo cp iwlwifi-ty-a0-gf-a0-72.ucode iwlwifi-ty-a0-gf-a0.pnvm /lib/firmware
All iwlwifi firmware is downloaded from the same GitHub repository. Only the firmware name needs to be changed.
Now reboot the board for the system to load the firmware. Using dmesg, check whether the firmware is loaded correctly:
vicharak@vicharak:~$ dmesg | grep iwlwifi
[    7.830637] iwlwifi 0002:21:00.0: loaded firmware version 72.a764baac.0 ty-a0-gf-a0-72.ucode op_mode m
[    7.830719] iwlwifi 0002:21:00.0: Detected Intel(R) Wi-Fi 6 AX210 160MHz, REV=0x420
[    8.014651] iwlwifi 0002:21:00.0: loaded PNVM version 1c1ef094
[    8.029712] iwlwifi 0002:21:00.0: Detected RF GF, rfid=0x10d000
[    8.099632] iwlwifi 0002:21:00.0: base HW address: f4:a4:75:b3:46:dd
[    8.143493] iwlwifi 0002:21:00.0 wlP2p33s0: renamed from wlan2
Verifying creation of a new network interface supporting Wireless LAN.
vicharak@vicharak:~$ ip a
1: lo: <LOOPBACK,UP,LOWER_UP> mtu 65536 qdisc noqueue state UNKNOWN group default qlen 1000
    link/loopback 00:00:00:00:00:00 brd 00:00:00:00:00:00
    inet 127.0.0.1/8 scope host lo
       valid_lft forever preferred_lft forever
    inet6 ::1/128 scope host noprefixroute
       valid_lft forever preferred_lft forever
2: end1: <BROADCAST,MULTICAST,UP,LOWER_UP> mtu 1500 qdisc mq state UP group default qlen 1000
    link/ether a2:14:85:f6:71:a0 brd ff:ff:ff:ff:ff:ff
    inet 192.168.1.48/24 brd 192.168.1.255 scope global dynamic noprefixroute end1
       valid_lft 86033sec preferred_lft 86033sec
    inet6 fe80::465f:6f3e:cc73:7451/64 scope link noprefixroute
       valid_lft forever preferred_lft forever
3: wlan0: <NO-CARRIER,BROADCAST,MULTICAST,UP> mtu 1500 qdisc mq state DOWN group default qlen 1000
    link/ether 40:f4:c9:94:85:38 brd ff:ff:ff:ff:ff:ff
4: wlP3p49s0: <NO-CARRIER,BROADCAST,MULTICAST,UP> mtu 1500 qdisc noqueue state DOWN group default qlen 1000
    link/ether 80:86:f2:35:11:0a brd ff:ff:ff:ff:ff:ff
If drivers are installed and firmware has been loaded correctly a new entry should appear under ip a.In this case wlP3p49s0 is the WLAN interface created by the WiFi Card.
Usage of
nmclicommand-line utility
List available WiFi Networks
vicharak@vicharak:~$ nmcli device wifi list ifname wlP3p49s0
IN-USE  BSSID              SSID              MODE   CHAN  RATE        SIGNAL  BARS  SECURITY
        5E:A4:F4:26:51:9D  Vicharak 4G       Infra  4     130 Mbit/s  100     ▂▄▆█  WPA2
        54:43:B2:31:13:01  test1test%3       Infra  3     135 Mbit/s  92      ▂▄▆█  WPA2
        54:43:B2:31:12:05  officshubh%2      Infra  6     135 Mbit/s  87      ▂▄▆█  WPA2
        54:43:B2:31:13:8D  test1test%3       Infra  3     135 Mbit/s  77      ▂▄▆_  WPA2
        54:43:B2:30:ED:15  DOT_c60b40198298  Infra  3     135 Mbit/s  75      ▂▄▆_  WPA2
        3C:84:6A:71:48:A8  Mogambo           Infra  3     270 Mbit/s  74      ▂▄▆_  WPA2
        28:6B:35:57:7F:B5  vanshika          Infra  1     130 Mbit/s  72      ▂▄▆_  WPA2 WPA3
        6A:E5:32:AA:3B:6C  JioFiber-NRjG4    Infra  6     270 Mbit/s  66      ▂▄▆_  WPA2
        62:BD:2C:49:F7:49  --                Infra  1     130 Mbit/s  59      ▂▄▆_  WPA2
        E0:D4:64:31:B7:76  --                Infra  11    130 Mbit/s  55      ▂▄__  --
        54:43:B2:31:12:C9  test1test%3       Infra  3     135 Mbit/s  25      ▂___  WPA2
Connect to a network
vicharak@vicharak:~$ sudo nmcli device wifi connect "JioFiber-NRjG4" password "*****" ifname wlP3p49s0
Device 'wlP3p49s0' successfully activated with 'ea128cb2-c051-445a-9195-d54304271a97'.
Check connection status
vicharak@vicharak:~$ nmcli device status
DEVICE             TYPE      STATE         CONNECTION
end1               ethernet  connected     Wired connection 1
wlP3p49s0          wifi      connected     JioFiber-NRjG4
wlan0              wifi      disconnected  --
lo                 loopback  unmanaged     --
p2p-dev-wlP3p49s0  wifi-p2p  unmanaged     --
p2p-dev-wlan0      wifi-p2p  unmanaged     --
M-Key PCIe Expansion Board
NVMe SSD
The board has been provided with a M-Key M.2 Connector. This extension board is tested using the E1000 NVMe SSD. Follow these steps to interface a NVMe device with Axon:
Verify proper overlay setting using this guide
Insert the NVMe in the M.2 connector present on the extension board and
rebootAxon.
vicharak@vicharak:~$ sudo reboot
Use
lspcito check PCIe Link Training Success.
vicharak@vicharak:~$ lspci
0003:30:00.0 PCI bridge: Rockchip Electronics Co., Ltd RK3588 (rev 01)
0003:31:00.0 Non-Volatile memory controller: Silicon Motion, Inc. Device 2261
If PCIe communication is working and NVMe is listed under
lspciuselsblkto check if NVMe is listed under block devices.
vicharak@vicharak:~$ lsblk | grep nvme
nvme0n1      259:0    0 119.2G  0 disk
├─nvme0n1p1  259:1    0     4M  0 part
├─nvme0n1p2  259:2    0     4M  0 part
├─nvme0n1p3  259:3    0   512M  0 part
├─nvme0n1p4  259:4    0   288M  0 part
├─nvme0n1p5  259:5    0   256M  0 part
└─nvme0n1p6  259:6    0 118.2G  0 part
If you have
nvme-cliinstalled then you can usesmart-logto test NVMe. The output will show more logs but we are more concerned about mentioned results.
sudo nvme smart-log /dev/nvme0n1
critical_warning                     : 0
temperature                          : 38 °C (311 K)
percentage_used                      : 0%
media_errors                         : 0
num_err_log_entries                  : 0
Warning Temperature Time             : 0
Warning
The SSD worked without manual driver or firmware installation as support is built into the kernel and the SSD has inbuilt firmware.
Ensure your device has the necessary drivers and firmware loaded.